Functions
Within cards you will make use of functions and expressions to describe the logic of your impact service.
Cards allow for various functions: replying with multi-media or interactive buttons, updating contact fields, integrating with 3rd party services or doing various calculations.
Text messages
Send a text message
This function sends a text message to the user.
Syntax
text("lorem ipsum")
Options
| Option | Type | Description |
|---|---|---|
ai_generated | boolean or expression | When set to true, marks the message as AI-generated. This enables the "Inspect AI Session" button in the inbox for debugging AI responses. Can also be a variable reference that evaluates to a boolean at runtime. |
Example
The following example creates a journey that sends a single text message to a user. The content of the message says "Hello this is my first text.".
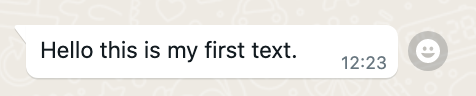
card TextCard do
    text("Hello this is my first text.")
end
Example with AI-generated content
When your journey uses AI to generate responses (e.g., via external API calls or custom logic), you can mark the message as AI-generated:
card AIResponse do
    # Generate response using your AI logic
    ai_response = webhook("https://my-ai-service.com/generate", body: "@user_message")

    text("@ai_response.content", ai_generated: true)
end
You can also use a variable to dynamically control whether a message is marked as AI-generated:
card DynamicAI do
    is_ai_response = some_condition()
    text("@response", ai_generated: is_ai_response)
end
This will show the "Inspect AI Session" button when viewing this message in the inbox, allowing operators to debug AI-generated content.
Common errors
- Not wrapping the message in double quotes.
- text() is misspelt as test().
Ask a question
This function sends a text message and waits for the user’s response.
Syntax
ask("lorem ipsum?")
Options
| Option | Type | Description |
|---|---|---|
ai_generated | boolean or expression | When set to true, marks the message as AI-generated. This enables the "Inspect AI Session" button in the inbox for debugging AI responses. Can also be a variable reference that evaluates to a boolean at runtime. |
Example
The following example creates a journey that asks the user "What is your name?" and then waits for the user’s response. Once the user replies a thank you message is sent.
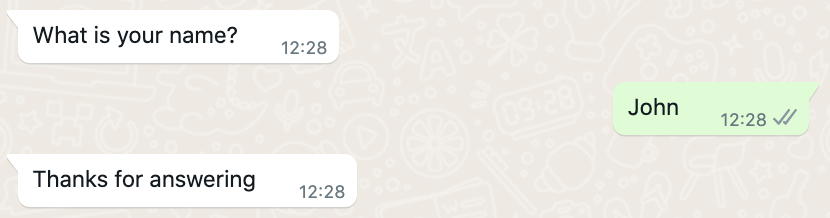
card QuestionCard do
    ask("What is your name?")
    text("Thanks for answering")
end
Key things to note
- The chat service will only execute further steps when a response is received or, else, when the journey times out.
Common errors
- Not wrapping the question in double quotes.
Interactive messages
WhatsApp supports two types of quick replies: button replies and list replies.
Buttons replies are limited to 3 buttons. Each button has a limit of 20 characters.
List replies are limited to 10 options. Each option has a limit of 24 characters.
The body text, the header, and the footer of an interactive message can be placed into the buttons or list blocks so it can be composed as a single message.
Send a button message
This function sends a text message with buttons to the user. Buttons make it easy for the user to reply. You can add up to 3 buttons per message.
Syntax
buttons([Button1, Button2, Button3]) do
    text("Select an option!")
end
You can also use labels for the buttons like so:
buttons([Button1: "1️⃣", Button2: "2️⃣", Button3: "3️⃣"]) do
    text("Select an option!")
end
Example
The following example creates a journey that ask the user "What would you like to drink?" and provide two options to select from: Tea or Coffee.
If the user selects Tea they receive a message saying "Thanks for choosing tea". If the user selects Coffee they receive a response saying "Thanks for choosing coffee".
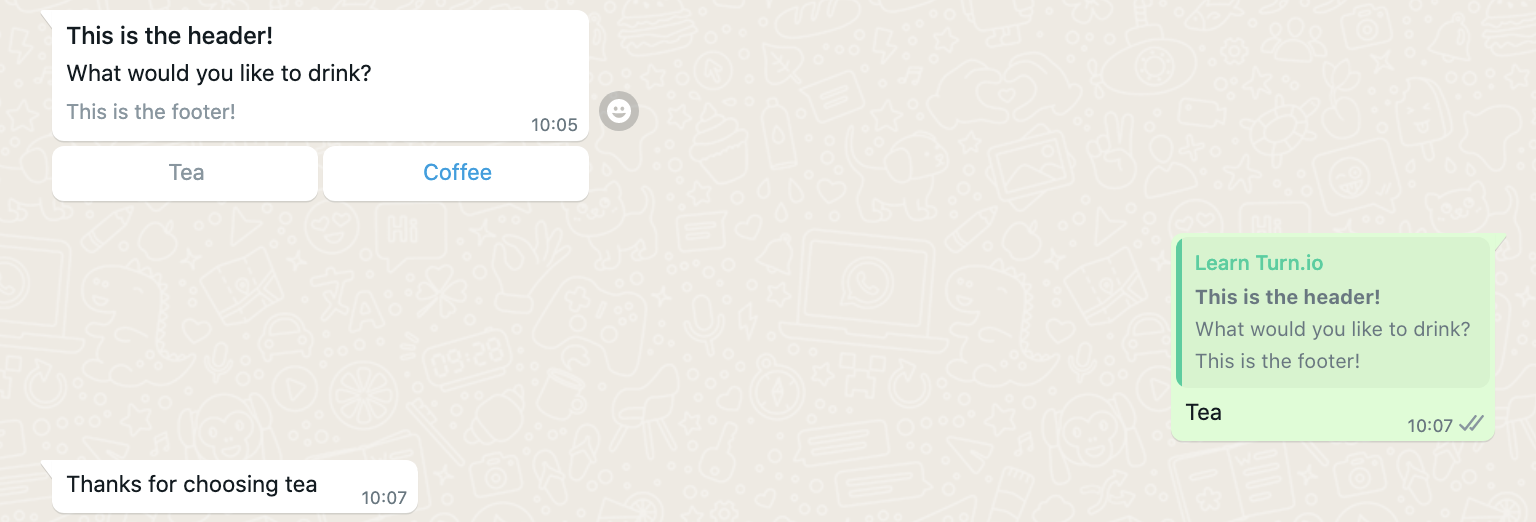
card ButtonsCard do
    buttons([Tea, Coffee]) do
        text("What would you like to drink?")
        header("This is the header!")
        footer("This is the footer!")
    end
end

card Tea do
    text("Thanks for choosing tea")
end

card Coffee do
    text("Thanks for choosing coffee")
end
You can provide labels for the buttons (e.g. Tea 🫖), while keeping a simple card name (e.g. Tea).
card ButtonsCard do
    buttons([Tea: "Tea 🫖", Coffee: "Coffee ☕️"]) do
        text("What would you like to drink?")
        header("This is the header!")
        footer("This is the footer!")
    end
end
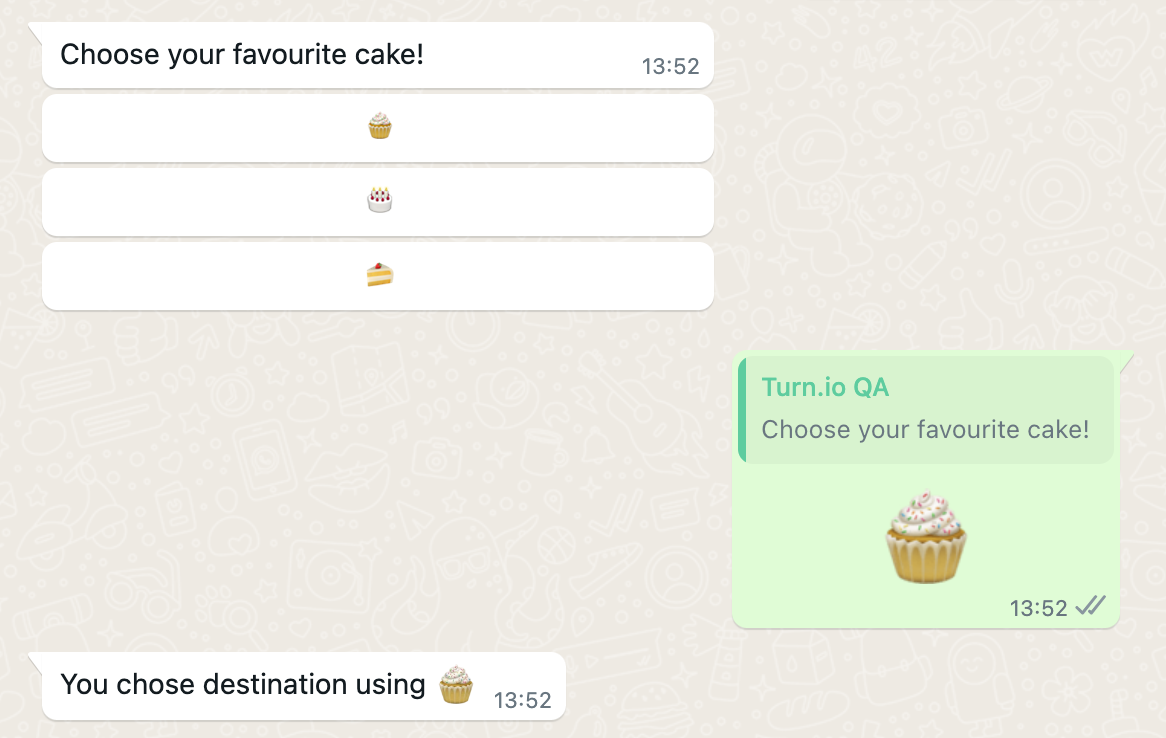
Sometimes, one wants to provide multiple buttons with different labels and but have them go to the same destination card. It's possible to do so by using the same destination card name, with different labels.
card Card do
  var =
    buttons(Destination: "🧁", Destination: "🎂", Destination: "🍰") do
      text("Choose your favourite cake!")
    end
end

card Destination do
  text("You chose @var using @var.label ")
end
This will present 3 buttons, each with a different label but the response
is all handled by the same card with the name Destination. Keep in mind that
even if the Destination card may have a display label assigned, any label set
in the button will take priority over display labels on the card.
Key things to note
- You need to use both the
buttons()and thetext()functions. - The
buttons()function describes the available options. Buttons can have up to 3 options. Button options have a limit of 20 characters. - The
text()function describes the instruction to the user. - The header and footer are optional.
- If you want to act on the user selection you need to add new cards to the journey to define the logic of each selected option.
Common errors
- Forgetting to add the
text()function into thebuttons()function. - Forgetting to add cards for each button option.
Send a list message
This function sends a list of items to the user to select from. You can add up to 10 options in a list.
Syntax
list("lorem ipsum", [Option1, Option2, …, Option10]) do
    text("lorem ipsum")
end
Example
The following example creates a journey that sends the user a list message and allows them to choose between four options.
The user is instructed to "Pick an option!". Once they click the "Call to action" text the list expands and they see 4 options: Option1, Option2, Option3, Option4. After the user makes a selection, they get a message confirming their choice.
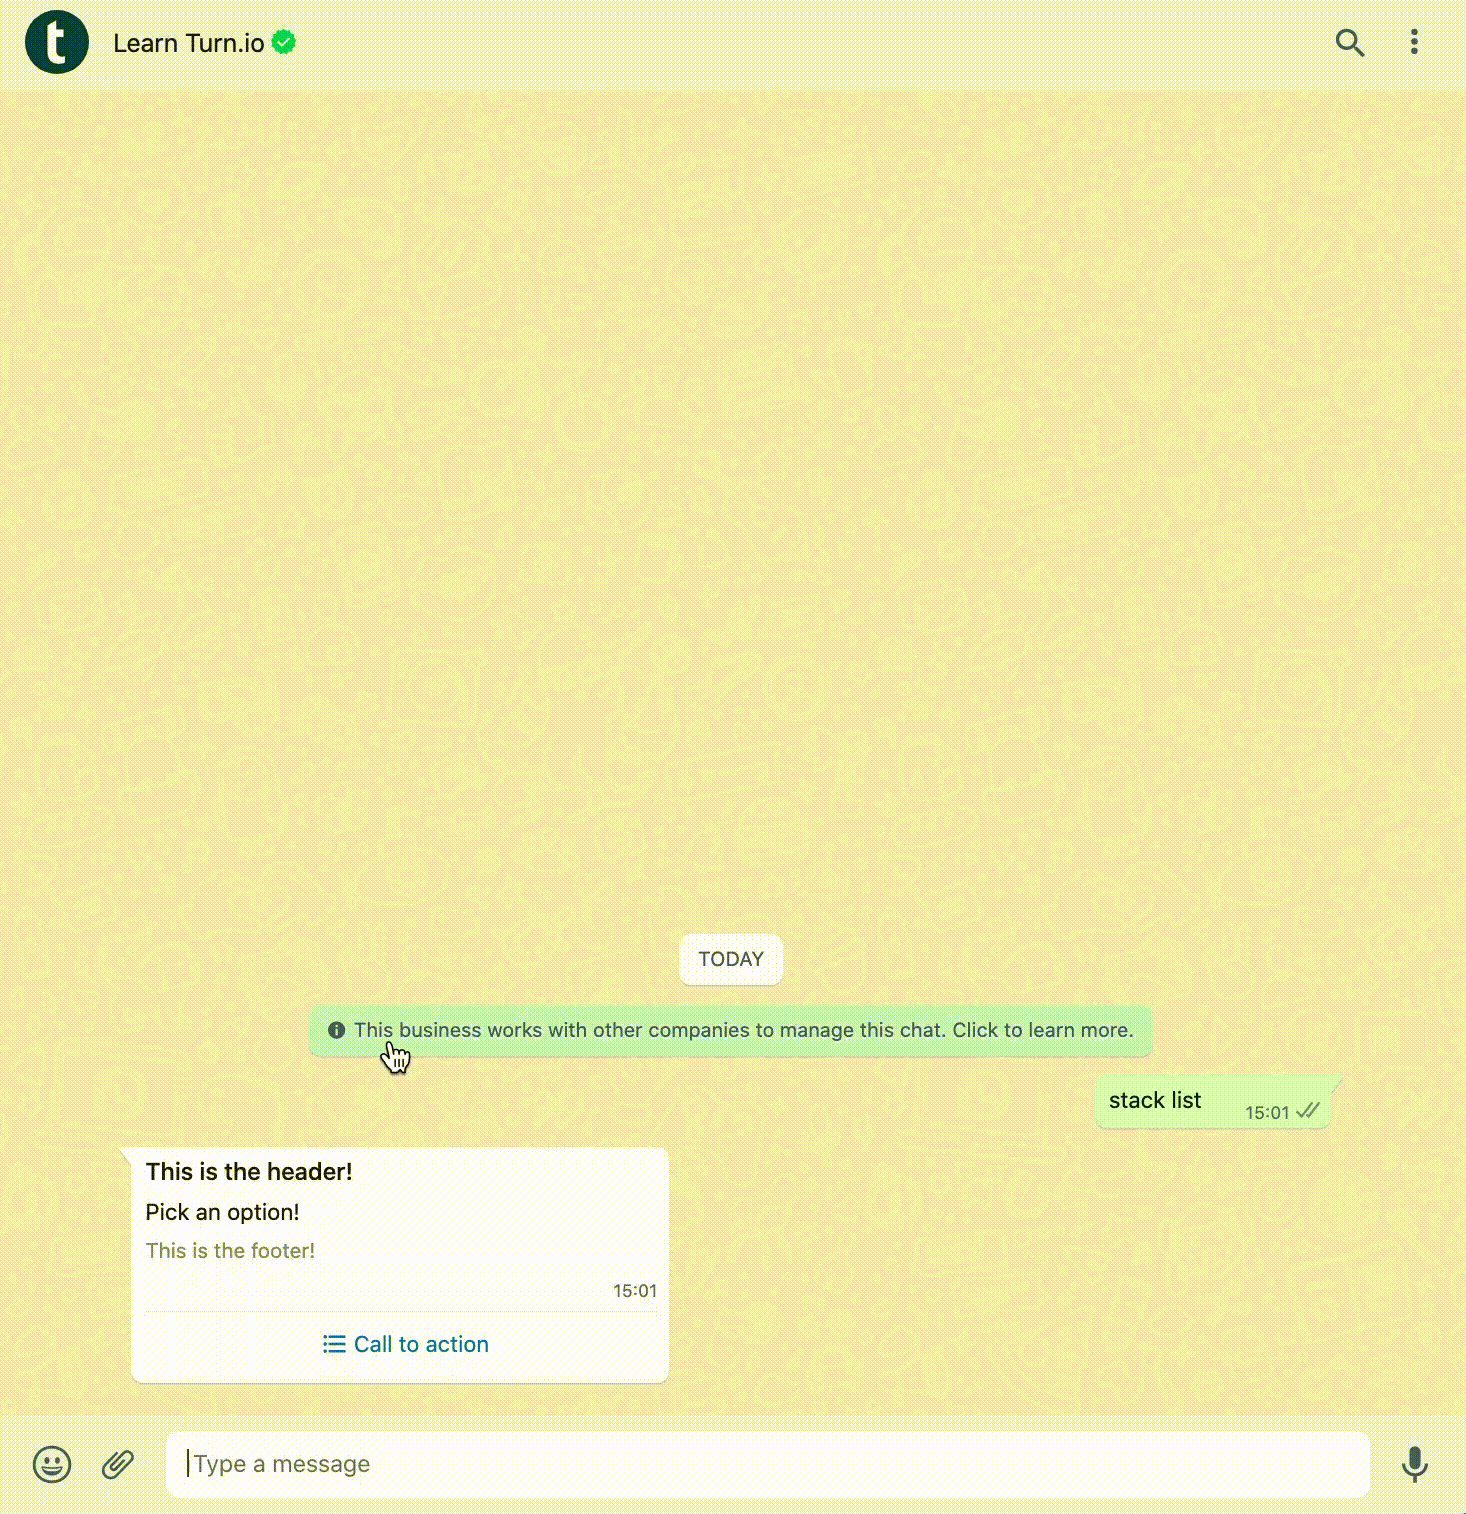
card List do
    list("Call to action", [Option1, Option2, Option3, Option4]) do
        text("Pick an option!")
        header("This is the header!")
        footer("This is the footer!")
    end
end

card Option1 do
    text("You selected option 1")
end

card Option2 do
    text("You selected option 2")
end

card Option3 do
    text("You selected option 3")
end

card Option4 do
    text("You selected option 4")
end
Key things to note
- You need to use both the
list()and thetext()functions. - The
list()function describes the copy for the selection button, as well as all the available options. Lists can have up to 10 options. List options have a limit of 24 characters. - The
text()function describes the instruction to the user. - The header and the footer are optional.
- If you want to act on the user selection you need to add new cards to the journey to define the logic of each selected option.
Common errors
- Forgetting to add text for the selection button.
- Forgetting to add the text() function after the list() function.
- Forgetting a comma between the selection text button and the options.
- Forgetting to add cards for each list option.
Request location
This function sends an interactive message requesting the user to share their location using WhatsApp's built-in location sharing feature.
Syntax
request_location("Please share your location")
Example
The following example creates a journey that requests the user's location and then processes the shared location data.
card RequestLocation do
  request_location("Please share your location so we can assist you better")
  then(ProcessLocation when event.message.type == "location")
  then(Fallback)
end

card ProcessLocation do
  latitude = event.message.location.latitude
  longitude = event.message.location.longitude

  text("Thank you! We've received your location: [@latitude, @longitude]")
end

card Fallback do
  text("Please share your location using the WhatsApp location feature")
  then(RequestLocation)
end
You can also store the location in a variable for later use:
card RequestLocation do
  user_location = request_location("Please share your location so we can assist you better")

  then(ProcessLocation when event.message.type == "location")
  then(Fallback)
end

card ProcessLocation do
  text("Thank you! We've received your location: [@user_location.latitude, @user_location.longitude]")
end

card Fallback do
  text("Please share your location using the WhatsApp location feature")
  then(RequestLocation)
end
The sample format you can expect from WhatsApp when a user shares a location is:
%{
  "address" => "Piazza del Colosseo, 1, Roma, 00184, Lazio, IT",
  "latitude" => 41.89019183,
  "longitude" => 12.49224535,
  "name" => "Colosseum",
  "url" => "https://colosseo.it/"
}
Note: Only latitude and longitude are guaranteed to be present. The other fields (address, name, and URL) may be missing, as this depends on the information that Google Maps has for the point shared by the user. If you want to access or use these fields, remember to check for their existence first, for example:
location = request_location("Where are you?")
address = if(isstring(location.address), do: "@location.address", else: "Address not found")
text("Your address: @address")
Key things to note
- The
request_location()function sends a special interactive message that prompts the user to share their location - The user must actively choose to share their location using WhatsApp's location sharing button
- The shared location data includes latitude and longitude coordinates
- Always include a fallback card to handle cases where the user doesn't share a location or sends a different type of message
- The location data is available through
event.message.locationwhen the message type is "location"
Common errors
- Not checking if the message type is "location" before trying to access location data
- Forgetting to add a fallback card for when users don't share their location
- The request message must be a string. You can also interpolate expressions like this
"@contact.name, please share your location"
Display product catalog
This function sends an interactive message displaying your WhatsApp Business product catalog, allowing users to browse products and place orders directly within the chat.
Syntax
catalog("Browse our products")
You can also add an optional footer:
catalog("Browse our products") do
  footer("Powered by our store")
end
Example
The following example creates a journey that displays a product catalog and then processes the order when the user sends it.
card ShowCatalog do
  catalog("Check out our latest products")

  then(ProcessOrder when event.message.type == "order")
  then(Fallback)
end

card ProcessOrder do
  catalog_id = event.message.order.catalog_id
  product_items = event.message.order.product_items

  text("Thank you for your order!")
  text("Catalog ID: @catalog_id")
  text("Total: @order.total")
  text("You ordered @product_items items")
end

card Fallback do
  text("Please browse our catalog and select products to order")
  then(ShowCatalog)
end
You can also store the catalog response in a variable for simpler access:
card CatalogWithOrder do
  order = catalog("Browse our catalog") do
    footer("Free delivery on orders over $50")
  end

  then(ProcessOrder when event.message.type == "order")
  then(Fallback)
end

card ProcessOrder do
  # Process the order when received
  text("Order received!")
  text("Catalog ID: @order.catalog_id")
  text("Products ordered: @order.product_items")

  # You can access individual product details
  text("First product ID: @order.product_items[0].product_retailer_id")
  text("Quantity: @order.product_items[0].quantity")
end

card Fallback do
  text("Please browse our catalog and select products to order")
  then(ShowCatalog)
end
The order data structure returned when a user places an order includes:
%{
  "catalog_id" => "123456789",
  "total" => 59.98
  "product_items" => [
    %{
      "product_retailer_id" => "product_001",
      "quantity" => 2,
      "item_price" => 29.99,
      "currency" => "USD"
    }
  ]
}
Please refer to Meta’s documentation for more details about the order data structure.
Key things to note
- The
catalog()function displays products from your WhatsApp Business catalog - Your WhatsApp Business account must have a product catalog configured
- Users can browse products, view details, and add items to their cart
- When users send their order, the journey continues with order data available in the assigned variable
- The optional footer can provide additional information like delivery terms or store policies
- Order data includes catalog ID and detailed product information
Common errors
- Not having a product catalog configured in your WhatsApp Business account
- Not checking if the message type is "order" before trying to access order data
- Forgetting to add a fallback card for when users don't share their location
- The catalog and footer message must be a string. You can also interpolate expressions like this
"@contact.name, browse our products!"
Send a call-to-action URL message
This function sends an interactive message with a single button that opens a URL when tapped. Unlike regular links in text messages, the URL is presented as a proper button, which makes for a cleaner message and a clearer call to action.
Syntax
whatsapp_cta("Button label", "https://example.com") do
  text("The body of the message")
end
The header() and footer() functions are optional inside the whatsapp_cta() block. Instead of a text header, you can also use a single media item — image(), video(), or document() — as the header.
Example
The following example sends a message with a "Visit our site" button that opens the given URL:
card SendCta do
  whatsapp_cta("Visit our site", "https://example.com") do
    header("Special offer")
    text("Tap below to learn more")
    footer("Powered by WhatsApp")
  end
end
You can also use an image (or video or document) as the header:
card SendCtaWithImage do
  whatsapp_cta("Shop now", "https://example.com/shop") do
    image("https://example.com/banner.png")
    text("Check out our new arrivals!")
  end
end
Key things to note
- You need to use both the
whatsapp_cta()and thetext()functions. Thetext()function describes the body of the message. - The first argument is the button label and the second argument is the URL opened when the button is tapped.
- The header and footer are optional. The header can be either text or a single media item, not both.
- Tapping the button opens the URL on the user's device; it does not send a reply back to the journey. The journey continues immediately after the message is sent.
Common errors
- Forgetting to add the
text()function inside thewhatsapp_cta()block. - Adding both a text
header()and a media item — only one header is allowed.
Labels for buttons and list items
Often times on an impact service you will re-use things, e.g. your menu. When you need to make updates to your copy, ideally you want to update it once and have that change apply everywhere that is applicable. This is possible for button and list options.
Syntax
When defining cards you can add an optional label for the card. The label will be used for buttons and list items the card is part of.
card ButtonCard, "lorem ipsum" do
  buttons([Button1, Button3, Button3]) do
  text("lorem ipsum")
  end
end
Example
Let's create a basic menu selection with 3 options: About, Contact and Terms of service (ToS). Once the user clicks any of the buttons, they get a short message with a single button that takes them back to the Start.

card Start do
  buttons([About, Contact, ToS]) do
    text("This our menu. Select an option.")
  end
end

card About do
    buttons([Start]) do
        text("This is about us, we are truly wonderful!")
    end
end

card Contact do
    buttons([Start]) do
        text("You can contact us via pigeon post, glhf")
    end
end

card ToS do
    buttons([Start]) do
        text("We provide zero guarantees")
    end
end
Now, let's say we want to change the copy of the Start button. We use it three times but only want to update it once. You can do that by specifying the copy you want as a string in that button option card.
By adding the "Menu" label to the definition of the Start card, that label will now be used in any button or list item where the Start card is referenced.
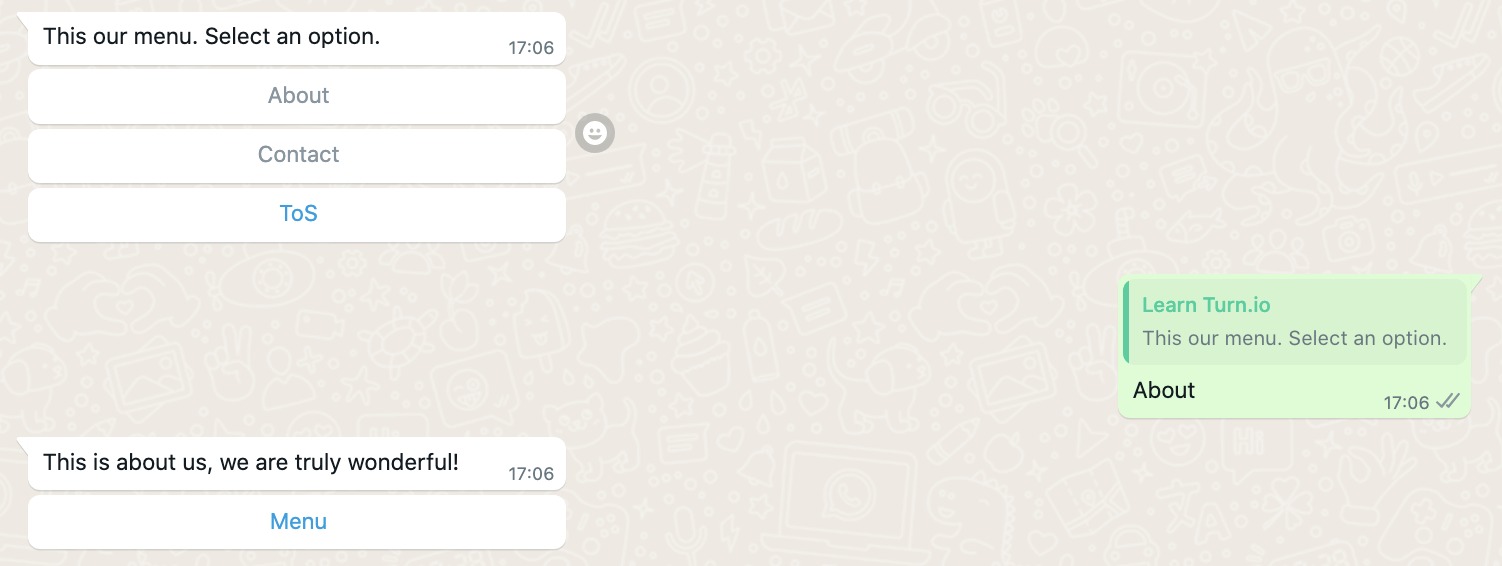
card Start, "Menu" do
  buttons([About, Contact, ToS])
  text("This our menu. Select an option.")
end

card About do
    buttons([Start]) do
        text("This is about us, we are truly wonderful!")
    end
end

card Contact do
    buttons([Start]) do
        text("You can contact us via pigeon post, glhf")
    end
end

card ToS do
    buttons([Start]) do
        text("We provide zero guarantees")
    end
end
The best part about the string is that you can also use dynamic fields, which is great for personalisation. Let's update the Start button to include the user's profile name on WhatsApp.

card Start, "Head home @contact.whatsapp_profile_name" do
  buttons([About, Contact, ToS])
  text("This our menu. Select an option.")
end

card About do
    buttons([Start]) do
        text("This is about us, we are truly wonderful!")
    end
end

card Contact do
    buttons([Start]) do
        text("You can contact us via pigeon post, glhf")
    end
end

card ToS do
    buttons([Start]) do
        text("We provide zero guarantees")
    end
end
Media messages
Making use of media improves the user experience and can overcome literacy gaps. WhatsApp allows five types of media: image, video, audio, document and sticker.
The media you intend to send should ideally be hosted on Turn itself; however, a publicly accessible URL is also a valid input for these functions.
See how to upload media on Turn for usage in code-based journeys.
A simple way to host media on a publicly-accessible URL is to upload your file to Google Drive and then obtain a download link using this site. Make sure the sharing permissions is set to Any one with the link can view.
It is recommended that you upload the media to Turn, since media uploads on third-party platforms, including but not limited to Google Drive and AWS, often do not ensure that the request is serviced within an adequate time. This can lead to the request timing out and ultimately the user not receiving a response.
Send an image
This function sends an image to the user.
Syntax
image("<URL of your image>")
Example
The following example creates a journey that sends the user an image with a caption saying "hello there!".
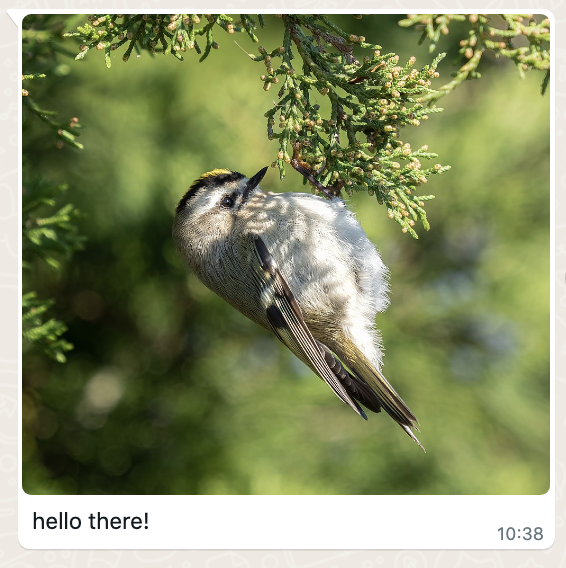
card MyCard do
    image("https://upload.wikimedia.org/wikipedia/commons/thumb/d/db/Golden-crowned_kinglet_at_JBWR_%2811835%29.jpg/1000px-Golden-crowned_kinglet_at_JBWR_%2811835%29.jpg")
    text("hello there!")
end
Key things to note
- You need to use both the
image()and thetext()functions. - The
image()function only holds the URL. Images can be up to 5MB. - The
text()function sends a text caption. - WhatsApp only supports specific file types.
Common errors
- Forgetting to add the text() function after the image() function.
Send a video
This function sends an image to the user.
Syntax
video("<URL of your video>")
Example
The following example creates a journey that sends the user a (cat) video with a caption saying "hello there!".

card MyCard do
    video("https://drive.google.com/uc?export=download&id=1LCTe5S6DT1mNnYQhaoeYsk3jqSAEglVE")
    text("hello there!")
end
Key things to note
- You need to use both the
video()and thetext()functions. - The
video()function only holds the URL. Videos can be up to 16MB. - The
text()function sends a text caption. - WhatsApp only supports specific file types.
Send an audio
This function sends an audio to the user.
Syntax
audio("<URL of your audio>")
Example
The following example creates a journey that sends the user an audio file and a text message saying "hello there!".
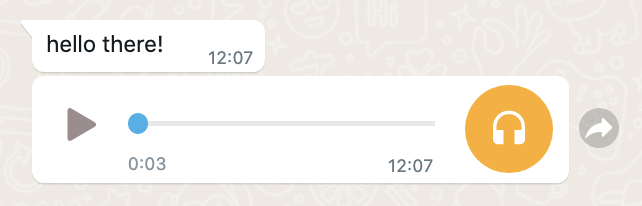
card MyCard do
    audio("https://drive.google.com/uc?export=download&id=1hpkdDN9noqIqvwDX0EhS2z7K2W_-khXS")
    text("hello there!")
end
Key things to note
- You need to use both the
audio()and thetext()functions. - The
audio()function only holds the URL. Audio files can be up to 16MB. - The
text()function sends a separate text message. - WhatsApp only supports specific file types.
Send a document
This function sends an document to the user.
Syntax
document("<URL of your document>", filename: "<Title of your document>")
Example
The following example creates a journey that sends the user a document named "Example" with a caption saying "hello there!".

card MyCard do
    document("https://drive.google.com/uc?export=download&id=17-O2zjqaI-eQdqVJ-febYBxr0E9YT_HU", filename: "Example")
    text("hello there!")
end
Key things to note
- You need to use both the
document()and thetext()functions. - The
document()function holds the URL and an optionalfilenameparameter. Document files can be up to 100MB. - The
text()function describes the caption of the media message. - WhatsApp only supports specific file types.
Template messages
You can send message templates from journeys provided that the template you want to send already exists and has been approved.
A WhatsApp message template is identified by its name and language, so you'll need both of those to send a template from journeys.
Syntax
send_message_template(
        "template-name",
        "template-language",
        ["body-placeholder1", "body-placeholder2", ...],
        translated_body_params: [spa: ["marcador-de-cuerpo1"], por: ["marcador-corpo1","marcador-corpo2"]],
        header: ["header-placeholder"],
        translated_header: ["spa": ["marcador-de-cabecera1"], "por": ["marcador-cabecalho1"]],
        video: "https://link.to/video.mp4",
        translated_video: ["spa": "https://link.to/el-video.mp4", "por": "https://link.to/o-video.mp4"],
        image: "https://link.to/image.mp4",
        translated_image: ["spa": "https://link.to/imagen.png", "por": "https://link.to/imagem.png"],
        document: "https://link.to/document.pdf",
        translated_document: ["spa": "https://link.to/el-documento.pdf", "por": "https://link.to/o-documento.pdf"],
        url: ["original-url-suffix"],
        translated_url: ["spa": "el-url-suffix", "por": "por-url-suffix"],
        buttons: [Card1, Card2, ...]
    )
The header, video, image, document, url, buttons, translated_header, translated_video, translated_image, translated_document, translated_url, and translated_body_params parameters are optional.
If you have the same template in other languages, you can pass the params for a given language using translated_header, translated_video, translated_image, translated_document, translated_url and translated_body_params params.
Template with params in the body
If the template contains params in its body, you can provide values for those params in a list after the template name and language.
In case the template doesn't have body params, you can pass an empty list [].
Example
Let's assume you have created the following template:
- name:
simple-reminder - language:
en - body:
Hi {{1}}, this a reminder to {{2}}
Here is how you could send that template:
card SendTemplate do
    send_message_template(
        "simple-reminder",
        "en",
        ["Mark", "exercise"]
    )
end
Template with params in the header
If the template contains params in its header, you can provide parameters for them passing a list of values to the optional header argument.
Example
Let's assume you have created the following template:
- name:
simple-reminder - language:
en - header:
{{1}} reminder - body:
Hi {{1}}, this a reminder to {{2}}
Here is how you could send that template:
card SendTemplate do
    send_message_template(
        "simple-reminder",
        "en",
        ["Mark", "exercise"],
        header: ["Training"]
    )
end
Template with a media header
If the template has a media header, you can use the optional video, image, document arguments to provide a link to the desired media.
Example
Let's assume you have created the following template:
- name:
simple-reminder - language:
en - header media type:
VIDEO - body:
Hi {{1}}, this a reminder to {{2}}
Here is how you could send that template:
card SendTemplate do
    send_message_template(
        "simple-reminder",
        "en",
        ["Mark", "exercise"],
        video: "https://link.to/the/video.mp4"
    )
end
Let's assume you have created the following template:
- name:
simple-reminder - language:
en - header media type:
IMAGE - body:
Hi {{1}}, this a reminder to {{2}}
Here is how you could send that template:
card SendTemplate do
    send_message_template(
        "simple-reminder",
        "en",
        ["Mark", "exercise"],
        image: "https://link.to/the/image.jpg"
    )
end
Let's assume you have created the following template:
- name:
simple-reminder - language:
en - header
media type: DOCUMENT - body:
Hi {{1}}, this a reminder to {{2}}
Here is how you could send that template:
card SendTemplate do
    send_message_template(
        "simple-reminder",
        "en",
        ["Mark", "exercise"],
        document: "https://link.to/the/document.pdf",
        filename: "Document title"
    )
end
Template with buttons
If the template contains buttons, you can use the optional buttons argument to direct the flow of the journey to different cards depending on the button the user clicks.
Example
Let's assume you have created the following template:
- name:
updates - language:
en - body:
Hi {{1}}, would you like to receive updates? - buttons:
Yes, I would love to!,No, I would not.
Here is how you could send that template and direct the flow of the journey depending on the button the user clicks:
card SendTemplate do
    send_message_template(
        "updates",
        "en",
        ["Mark"],
        buttons: [Yes, No]
    )
end

card Yes do
    text("Great! You will receive updates from now on.")
end

card No do
    text("Ok, you will not receive updates.")
end
It's important to note that the text of the buttons displayed in the simulator will likely be different from the ones displayed in WhatsApp. This is because the simulator uses the names of the cards you defined as options to simulate the display text for the buttons, while the real message uses the text you provided in the template.
Key things to note
- The template you want to send should already exists and be approved.
Receiving GPS coordinates
You can extract GPS coordinates, such as latitude and longitude, from a user's shared location pin in the WhatsApp mobile application.
Syntax
  latitude = event.message.location.latitude
  longitude = event.message.location.longitude
Example
The following example creates a journey that asks the user to share a GPS pin and extracts the GPS coordinates from it.
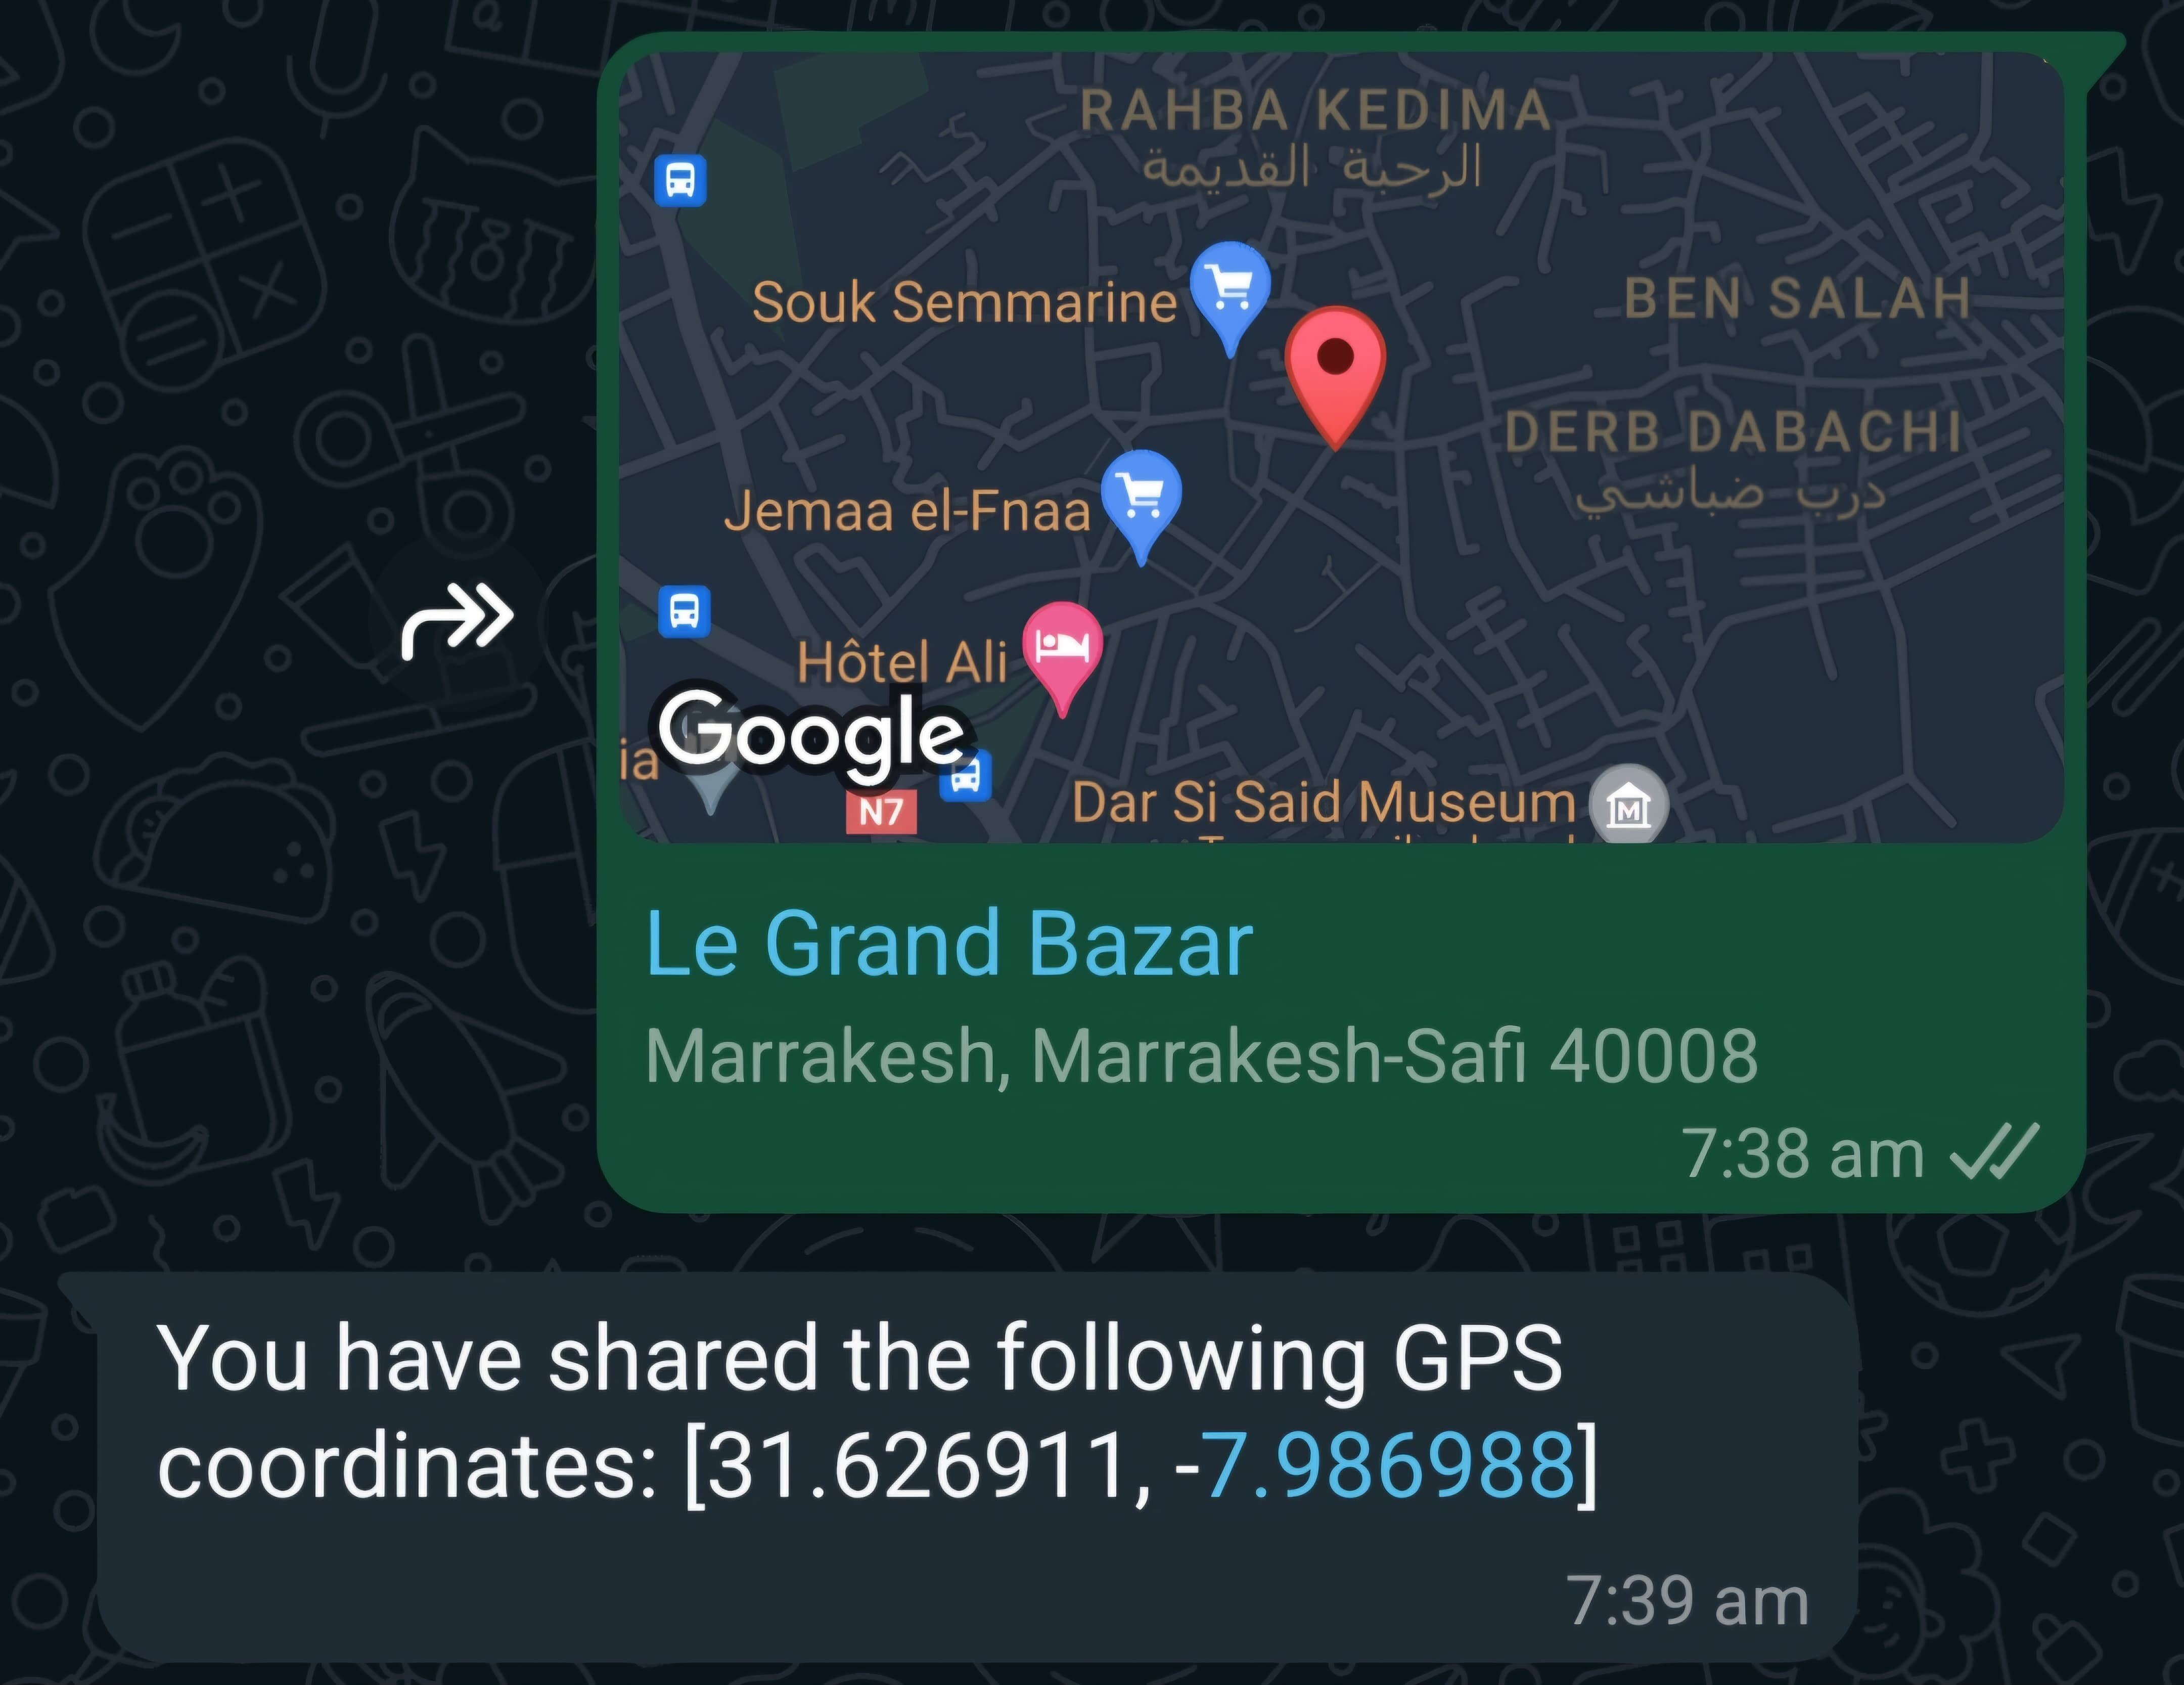
card AskForGpsPin, then: ParseLocation do
  ask("Please send your GPS Pin using WhatsApp")
end

card ParseLocation when event.message.type == "location" do
  latitude = event.message.location.latitude
  longitude = event.message.location.longitude

  text("You have shared the following GPS coordinates: [@latitude, @longitude]")
end

card ParseLocation do
  text("You have not shared a valid GPS pin")
end
Key things to note
- You need to ensure that the message type being shared is "location" before you try to extract the latitude and longitude.
- Having a default condition is also necessary to ensure that cases where the user does not send in a GPS pin do not break the conversation flow.
Meta Conversions API
The Meta Conversions API allows you to send conversion events from your Journeys to Meta's systems. This helps you track and measure the effectiveness of your marketing campaigns by sending conversion data directly from Turn's platform, improving ad targeting, measurement, and optimization.
The conversion() function enables you to send conversion events from within your journeys, making it easy to track important customer actions like purchases, registrations, or any custom events relevant to your business.
Events are sent to the Meta Pixel dataset linked to the WhatsApp Business Account (WABA) of the Number used in your Journey. The Turn.io Conversions API integration automatically connects to the existing Meta dataset for the Conversion API linked to the Organisation's WhatsApp Business Account (WABA). If no dataset exists, it creates a new one. Before starting to use this in production, make sure the events are being stored correctly in a Meta dataset. You can check and set up your dataset using Meta Events Manager.
Send a conversion event
This function sends a conversion event to Meta's Conversions API.
Syntax
conversion(
  "event_name",
  [user_data_field1: "value1", user_data_field2: "value2"],
  optional_field1: "value1",
  optional_field2: "value2"
)
The following syntax is also accepted, it is the one used by the auto-generated DSL code for the Conversion canvas cards:
conversion(
  "event_name",
  [
    {"user_data_field1", "value1"}, {"user_data_field2", "value2"}],
  [
    {"optional_field1", "value1"},
    {"optional_field2", [optional_field2_1: "value2_1", optional_field2_1: "value2_2"]}
  ]
)
Parameters
The conversion() function accepts the following parameters:
- event_name (required, first argument): The name of the conversion event (e.g., "Purchase", "LeadSubmitted", "CompleteRegistration", "AddToCart")
- user_data (required, second argument): A keyword list containing user information like email, phone number, or other identifiers that help Meta match the conversion to the right person
- optional fields (optional): Any number of additional fields supported by the Conversions API
The event_time is automatically set to the time when the event is sent, but you can override it by passing it as an optional argument.
For a complete list of available user data fields and optional parameters, refer to Meta's Conversions API Parameters documentation.
Automatic normalization and hashing
Turn automatically normalizes and hashes user data fields before sending them to Meta, following Meta's customer information parameters requirements. You don't need to worry about formatting or hashing these fields yourself.
Fields that are automatically hashed (SHA256):
| Field | Description |
|---|---|
em | Email address |
ph | Phone number |
fn | First name |
ln | Last name |
db | Date of birth |
ge | Gender |
ct | City |
st | State |
zp | Zip/Postal code |
country | Country |
external_id | External ID |
Formatting recommendations:
For best matching results, format these fields as follows before passing them to the conversion() function:
| Field | Format | Example |
|---|---|---|
db | YYYYMMDD (with or without punctuation) | 19910526 or 1991-05-26 |
ge | Single letter: f for female, m for male | f |
zp | US: first 5 digits only. UK: area, district, and sector (e.g., SW1A 1) | 90210 |
country | 2-letter ISO 3166-1 alpha-2 code | US, BR, GB |
Normalization rules applied before hashing:
- Phone (
ph): All non-digit characters are removed - All other hashed fields: Whitespace is trimmed and text is converted to lowercase
All other user data fields are passed through to Meta without modification.
Recommended default configuration
When adding a Conversion card from the canvas, the following default configuration is generated:
conversion(
  "Purchase",
  [
    {"ctwa_clid", "@referral.ctwa_clid"},
    {"whatsapp_business_account_id", "<POPULATED_BY_TURN>"},
    {"ph", "@contact.whatsapp_id"}
  ],
  [
    {"action_source", "business_messaging"},
    {"messaging_channel", "whatsapp"},
    {"custom_data", [currency: "USD", value: "1"]}
  ]
)
We recommend starting with this configuration as a baseline. Here's what each parameter does:
User data fields:
| Field | Description |
|---|---|
ctwa_clid | Click to WhatsApp Click ID - crucial for attributing conversions to ads. We automatically store referral information in the @referral.ctwa_clid variable when a message contains it. |
whatsapp_business_account_id | Your WhatsApp Business Account ID. Use the special value <POPULATED_BY_TURN> and Turn will automatically populate this with your WABA ID before sending the event. |
ph | The user's phone number for matching. We use @contact.whatsapp_id to automatically include the contact's WhatsApp number. |
Optional fields:
| Field | Description |
|---|---|
action_source | Set to business_messaging for WhatsApp-based conversions. |
messaging_channel | Set to whatsapp to indicate the conversion came from WhatsApp. |
custom_data | Additional event-specific data. For Purchase events, you must include currency and value. |
Default configurations for common events
When using the Conversion card on the canvas, the following defaults are automatically enforced:
For Purchase events:
action_source: "business_messaging"messaging_channel: "whatsapp"custom_data: Must includecurrency(e.g., "USD") andvalue(the purchase amount)
For LeadSubmitted events:
action_source: "business_messaging"messaging_channel: "whatsapp"
Meta Conversion works best when used in conjunction with ctwa_clid information (see Meta doc here).
Whenever we receive a message with referral information, we store it in the journey context in a variable called referral. Therefore, we recommend including ctwa_clid: "@referral.ctwa_clid" in your user_data.
For further information on Ads that Click to WhatsApp, see here.
Example
The following example tracks a purchase conversion after a user completes an order through a WhatsApp catalog:
card ProcessOrder do
  order = event.message.order
  catalog_id = order.catalog_id
  product_items = order.product_items
  total = order.total
  # Getting currency from the first product, assuming the same currency for all
  # the products, but we suggest to set a fixed value for this (such as "USD")
  # when offering product only in one currency
  currency = product_items[0].currency

  text("@event.message.order")

  # Send conversion event to Meta
  conversion(
    "Purchase",
    [
      ph: "@contact.whatsapp_id",
      whatsapp_business_account_id: "<POPULATED_BY_TURN>",
      ctwa_clid: "@referral.ctwa_clid"
    ],
    action_source: "business_messaging",
    messaging_channel: "whatsapp",
    custom_data: [currency: "@currency", value: "@total", product_catalog_id: "@catalog_id"]
  )

  text("Thank you for your order!")
end
One more example, tracking a content view:
card TrackView do
  event_name = "ViewContent"
  event_source_url = "http://test.com"
  ip_address = "1.2.2.1"

  conversion(
    "@event_name",
    [client_ip_address: "@ip_address", client_user_agent: "test user agent"],
    event_id: "event.id.122",
    event_source_url: "@event_source_url"
  )
end
Key things to note
- The
conversion()function sends events from Turn's platform to Meta's Conversions API - Events are automatically sent to the Meta Pixel dataset configured for your WABA/Number - ensure your WABA has a Meta Pixel dataset properly configured
- The event_time is automatically set when the event is sent, but can be overridden if needed
- User identifiers in the user_data keyword list help Meta match conversions to the right people for better ad targeting
- Use the optional test_event_code parameter to verify that your server events are received correctly by Facebook. Use this code to test your server events in the Test Events feature in Events Manager. See Test Events Tool for more details.
Testing events
You can use the test_event_code optional parameter to send test events:
conversion(
  "ViewContent",
  [client_ip_address: "1.1.1.1"],
  action_source: "website",
  test_event_code: "TEST12345"
)
Common errors
- Not providing the required parameters (event_name and user_data keyword list)
- Using invalid event names - stick to Meta's standard event names when possible
- Not having a Meta Pixel dataset configured for your WABA before using this function
To learn more about Meta Conversions API and how to set it up, visit:
WhatsApp Flows
WhatsApp Flows are phone based forms that are great for data collection. You can integrate these into your workflows and use the data collected to continue in your canvas or journey.
Syntax
flow = whatsapp_flow("the call to action", "the flow-id", "screen") do
  text("the body of the message")
end
The header() and footer() functions are optional in the whatsapp_flow()
block. If supplied they can have the text you want available in the header and footer of the WhatsApp Flow message.
Passing a Payload
When sending a WhatsApp Flow, you can pass a payload to pre-populate certain values in the flow. This is useful for personalizing the flow experience with data you already have about the contact for example.
flow = whatsapp_flow(
  "the call to action",
  "the flow-id",
  "screen",
  payload: """
  {
    "name": @contact.name
  }
  """) do
  text("the body of the message")
end
The payload is passed as a JSON string and can include variables from your contact data or other sources.
To accept a payload on WhatsApp you need to define data in the WhatsApp flow definition, as well as init-value for each input field.
{
    "version": "7.2",
    "screens": [
        {
            "id": "START_SCREEN",
            "title": "Hello World",
            "terminal": true,
            "success": true,
            "data": {
              "name": {
                  "type": "string",
                  "__example__": "John"
              },
            },
            "layout": {
                "type": "SingleColumnLayout",
                "children": [
                    {
                        "type": "TextInput",
                        "name": "name",
                        "label": "Name",
                        "init-value": "${data.name}"
                    },
                    …
                ]
            }
        }
    ]
}
Examples
Here's an example of using a WhatsApp Flow in a card and then using the data collected:
card Flow do
  flow =
    whatsapp_flow("click!", "123456789", "SIGN_UP") do
      header("this is the header")
      text("this is the body")
      footer("this is the footer")
    end

  then(ThankYou when has_text(flow.firstname))
  then(Other)
end

card ThankYou do
  text("Thank you! @flow.firstname @flow.lastname")
end

card Other do
  text("You did not submit the flow.")
end
Here's an example with a payload to pre-populate the user's name:
card PersonalizedFlow do
  flow =
    whatsapp_flow(
      "Complete your profile",
      "123456789",
      "PROFILE_SETUP",
      payload: """
      {
        "name": @contact.name,
        "email": @contact.email
      }
      """) do
      header("Profile Update")
      text("Please complete your profile information")
      footer("Your data is secure with us")
    end

  then(ThankYou when has_text(flow.firstname))
  then(Other)
end
WhatsApp Flows are current best designed and tested in your Facebook Business Manager account. Meta's Getting Started section for WhatsApp Flows is a great place to start.
The ID of your flow and the available screens are supplied by Facebook Business Manager
Turn does not currently support WhatsApp Flows with endpoints (i.e. no data exchange while the user is navigating through the form).
Turn only guarantees the working of WhatsApp Flows for the following devices as per [Meta's policies] (https://developers.facebook.com/docs/whatsapp/flows/introduction/):
- Android running OS 6.0 and newer
- iPhone running iOS 12 and newer
WhatsApp Calling
WhatsApp Business Calling lets users talk to your business over voice or video calls on WhatsApp. Journeys provide three functions to support calling: requesting permission to call the user, and sending voice or video call request messages that the user can tap to call you.
Request call permission
Before your business can place a call to a user, the user must grant call permission. This function sends WhatsApp's native call permission request message and waits for the user to respond.
Syntax
response = call_permission_request("Can we call you to assist?")
Example
The following example asks the user for permission to call them and branches on their response:
card RequestPermission do
  response = call_permission_request("Can we call you to confirm your booking?")

  then(Accepted when response == "accept" or response == "temporarily_accept")
  then(Rejected)
end

card Accepted do
  text("Great, we'll give you a call shortly!")
end

card Rejected do
  text("No problem, we'll continue over chat.")
end
The response is one of the following values:
| Value | Meaning |
|---|---|
accept | The user granted permanent call permission |
temporarily_accept | The user granted permission for a limited time |
reject | The user declined the request |
Key things to note
- The journey waits for the user to respond before continuing, just like
ask(). - If the user has already granted permanent call permission, the request message is not sent and the journey continues immediately with the acceptance path.
- The message body must be a string. You can interpolate expressions, e.g.
"@contact.name, can we call you?".
Common errors
- Not handling all possible response values — make sure there is a fallback
then()so declined requests don't leave the user stuck. - Forgetting that the journey blocks until the user responds (or the journey times out).
Send a voice call request
This function sends a message with a call button the user can tap to start a voice call with your business on WhatsApp.
Syntax
voice_call_request("Tap below to call us")
You can customise the call button label with the optional display_text argument:
voice_call_request("Tap below to call us", display_text: "Call support")
Example
The following example offers the user a voice call and then continues with the journey:
card OfferCall do
  voice_call_request("Tap below to call our support team", display_text: "Call support")
  text("We look forward to your call!")
end
Key things to note
- The
display_textargument is optional. When omitted, WhatsApp's default button label ("Call Now") is used. - This is a fire-and-forget message: the journey continues immediately after it is sent and does not wait for the user to start a call.
- The message body must be a string. You can interpolate expressions, e.g.
"Tap below to call us, @contact.name".
Send a video call request
This function sends a message with a call button the user can tap to start a video call with your business on WhatsApp. It works exactly like voice_call_request(), but starts a video call instead of a voice call.
Syntax
video_call_request("Tap below to start a video consultation")
You can customise the call button label with the optional display_text argument:
video_call_request("Tap below to start a video consultation", display_text: "Video call")
Example
card OfferVideoCall do
  video_call_request("Tap below to start a video consultation", display_text: "Video call")
end
Key things to note
- The
display_textargument is optional. When omitted, WhatsApp's default button label ("Call Now") is used. - This is a fire-and-forget message: the journey continues immediately after it is sent and does not wait for the user to start a call.
Personalisation
Journeys allows you to build highly personalised impact services. You can store responses from users momentarily in variables while the conversation happens, or more permanently against the user's contact profile.
Save a response and use it in conversation
Any response from a user can be stored momentarily in variables and used in future interactions. This provides a more personalised user experience.
Syntax
# Save a result into a variable
variable_name = some_function_call()

# Use an expression to put the variable's value in a string
text("The value is: @variable_name")
Example
Let's revisit the button example. This time will will store the selected options and reference it in future responses. You will notice we refer to the stored value in strings by using the @ symbol. This makes use of expressions to include the button picked in the response.
card Card do
  button_picked = buttons([Tea, Coffee]) do
      text("What do you like to have?")
    end
end

card Tea, "Tea 🫖" do
  text("You selected @button_picked")
end

card Coffee, "Coffee ☕️" do
  text("You selected @button_picked")
end
Update a contact profile field
This function updates a contact profile field with a defined value. Storing a value against the user's contact profile means it is available when the journey interaction ends and can be retrieved in future interactions. Updating multiple contact profile fields can be achieved by passing a list of profile fields with their values separated by commas.
The value can be any data captured while the user interacts with the Journey. All standard and custom fields can be updated with this function.
Syntax
# Updating one profile field
update_contact(profileFieldName: "value")

# Updating multiple profile fields
update_contact(profileFieldName1: "value1", profileFieldName2: "value2", profileFieldName3: "value3")
Example
The following example creates a journey that asks the user what their name is, saves the response to a variable called name, and updates the contact profile name field with that value.
card One, then: Two do
  name = ask("What is your name?")
end

card Two do
  update_contact(name: "@name")
  text("Your name has been updated to @contact.name")
end
Key things to note
- The contact profile field needs to exist already.
Running another journey
A journey can start the execution of another journey. This can be useful to break large services into multiple journeys or to extract common logic into a separate journey.
Syntax
run_stack("<uuid-of-the-journey-to-run>")
Retrieving the UUID of a journey
To run a journey you need its UUID. You can retrieve the UUID of the journey to run by clicking the "Copy ID" button next to it in the list of journeys:

Example
This example shows you how to call a journey B from withing journey A. The run_stack() function requires the UUID of the journey you want to run.
This would be the code for Journey A:
card MyCardA do
  text("Hello from Journey A")
  run_stack("d58b0319-eb3f-4884-b43b-4ef0b7c37e1d")
  text("Hello again from Journey A")
end
This the code for Journey B. Let's assume its UUID is d58b0319-eb3f-4884-b43b-4ef0b7c37e1d:
card MyCardB do
  text("Hello from Journey B")
end
Key things to note
- The flow goes back to the parent journey once the child journey ends.
- There is currently no way to pass parameters or expect a return value from a child journey, however you can update fields on the contact profile, which is available both to the parent and child journey.
Scheduling
A journey can schedule the execution of another journey (or itself) at some time in the future. This can be useful to program messages that will be sent to the user in some time from now (e.g. 2 days from now).
Syntax
The journey can be scheduled using either the in argument or the at argument.
The in argument requires a relative time expressed in seconds. The scheduled journey will execute after the number of seconds specified.
schedule_stack("<uuid-of-the-journey-to-schedule>", in: seconds)
The at argument requires an exact date, in a datetime format. This date can be expressed using one of our expressions. The scheduled journey will execute at the date and time that has been defined.
If you wanted to schedule a journey exactly two days from now you could do:
schedule_stack("<uuid-of-the-journey-to-schedule>", at: datetime_add(now(), 2, "D"))
Or if you wanted to schedule a journey to run at 9am, the next monday after a certain date you could do:
base_date = date(2023, 2, 08))
schedule_stack("<uuid-of-the-journey-to-schedule>", at: datetime_next("monday", "09:00", base_date))
A journey that was previously scheduled can also be canceled, using our cancel_scheduled_stacks function:
card TextCard, then: MaybeCancel do
  schedule_stack("<uuid-of-the-journey-to-schedule>", at: datetime_next("monday", "09:00", base_date))
  schedule_stack("<uuid-of-the-journey-to-schedule>", at: datetime_next("tuesday", "09:00", base_date))
  keep_going = ask("Do you want to keep receiving these messages? Type STOP to cancel them")
end

card MaybeCancel when keep_going == "STOP" do
  cancel_scheduled_stacks("<uuid-of-the-journey-to-cancel>")
end

card MaybeCancel do
  schedule_stack("40ac549a-a883-4c26-b3a2-6eaf8f799edb", at: datetime_next("friday", "10:00"))
end
Please note that this function cancels all scheduled journeys with the given UUID for that recipient, so in the example above, both scheduled journeys would be canceled.
Retrieving the UUID of a journey
To schedule a journey you need its UUID. You can retrieve the UUID of the journey to schedule by clicking the "Copy ID" button next to it in the list of journeys:
A basic reminder message
This example shows you how to schedule an individual reminder that will be sent to the user in 2 hours. You need to create two journeys. The schedule_stack() function requires the UUID of the journey you want to schedule.
This journey schedules a second journey to run in 2 hours from now. It refers to the other journey using its UUID:
card ScheduleReminder do
  text("We'll send you a reminder message in 2 hours")
  schedule_stack("d58b0319-eb3f-4884-b43b-4ef0b7c37e1d", in: 2 * 60 * 60)
end
This is the journey that will send the reminder message. Let's assume its UUID is d58b0319-eb3f-4884-b43b-4ef0b7c37e1d:
card SendReminder do
  text("Here is your reminder")
end
A more complete use case
In this example we allow the user to decide when they want to receive a reminder message. Once again two journeys are required.
This is the first journey the user interacts with. It schedules the execution of the second journey referencing it by UUID:
card FirstCard, then: NoChoice do
  buttons([OneHour, TwoDays, NextSaturday])
  text("When would you like to be reminded?")
end

card NoChoice do
  text("Please click on one of the buttons.")
end

card OneHour, "In 1 hour" do
  text("Ok, we'll remind you in 1 hour.")
  schedule_stack("5ac7f564-a158-4519-9e41-faac610d59ec", in: 60 * 60)
end

card TwoDays, "In 2 days" do
  text("Ok, we'll remind you in 2 days.")
  schedule_stack("5ac7f564-a158-4519-9e41-faac610d59ec", in: 2 * 24 * 60 * 60)
end

card NextSaturday, "Next Saturday at noon" do
  text("Ok, we'll remind you next Saturday at noon.")
  schedule_stack("5ac7f564-a158-4519-9e41-faac610d59ec", at: datetime_next("saturday", "12:00"))
end
This is the journey that will send the reminder message, Let's assume its UUID is 5ac7f564-a158-4519-9e41-faac610d59ec:
card SendReminder do
  # Send a template in order to support reminders longer than 24 hours
  send_message_template("reminder_template", "en", ["Time is up!"])
end
Key things to note
- The first argument needs to be a valid UUID of an existing journey on the same number.
- If a journey is scheduled to run after more than 24 hours, it should start by sending a message template. WhatsApp requires you to start a conversation with a template if the last message from the user is older than 24 hours.
When a schedule journey executes, it interrupts any other journey that is running at that time for the user.
Assistant AI functions
We provide a comprehensive set of assistant AI functions. These functions power the AI blocks in the Journey Canvas but they can be used directly from code blocks as well.
Connecting
You can either use the built-in AI Assistant to connect to AI vendors as an Assistant or you can connect directly with a token. The connection details are stored in the variable returned and should be passed as an argument to any of the other AI related functions.
Choose openai and meta_ai as AI vendors.
| Vendor | Vendor key |
|---|---|
| OpenAI | openai |
| Meta Llama | meta_ai |
card Start do
  # connect using an assistant configured in your account
  ai = ai_assistant("the-assistant-id")
  # or connect directly with a vendor ('openai' or 'meta_ai'), a model identifier and a token
  ai = ai_connect("openai", "gpt-4o", "the-token")
end
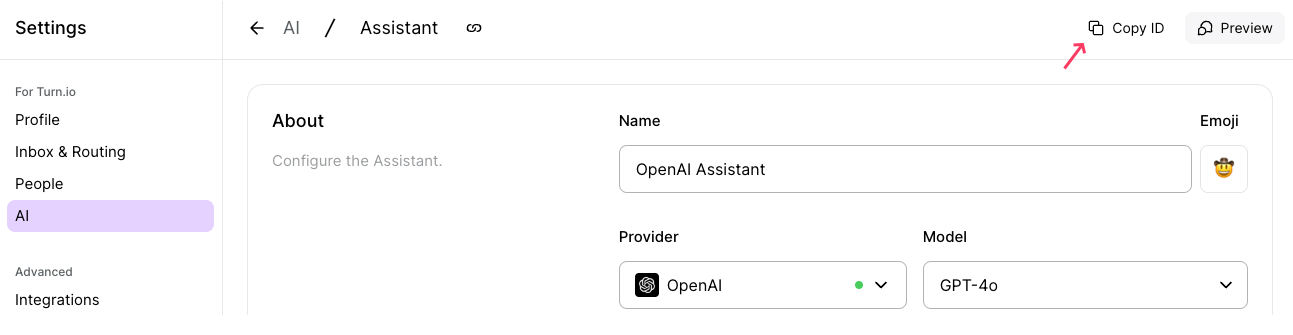
Finding the assistant ID
To find the assistant ID go to the assistant detail page and click the button 'Copy ID'.
Adding Context
Add a single message, with an accompanying role to the context with ai_add_message(). This context will be included in chat completions.
ai = ai_add_message(ai, "user", "the message")
Add an image for when you want to ask a question about a user submitted image and limit the response size of the answer to 150 characters.
Images are only supported for an assistant with "openai" as a vendor. See OpenAI Adding Images below.
Chat Completion
Chat Completion is the function for using AI to generate text based on the context supplied
completion = ai_chat_completion(ai)
This returns a complex object with a default value:
%{
  "error" => false,
  "status" => 200,
  "response" => %{
    "sentences" => ["the generated.", "response."],
    "__value__" => "the generated. response.",
    "combined" => "the generated. response."
  }
Text classification
Text Classification is the function for using AI to choose one of the given options.
classification = ai_text_classification(ai, "user-input", "system-prompt", ["option 1", "option 2", "option 3"])

option = classification.response
then(Option1 when option == 0)
then(Option2 when option == 1)
then(Option3 when option == 2)
then(Fallback when option == -1)
ai_text_classification() returns a complex object where response is an object with a classification value. The value is the zero-based index of the option. If no option matches the classification will be -1.
%{
  "error" => false,
  "status" => 200,
  "response" => %{
    "sentences" => ["{\"classification\": 1} "],
    "__value__" => 1,
    "functions" => [],
    "combined" => [
      %{"sentence" => "{\"classification\": 1} ", "type" => "sentence"}
    ]
  }
}
Transcribing Speech
Transcribing is only supported for an assistant with "openai" as a vendor. See OpenAI Transcribing Speech below.
Creating Speech
Speech is only supported for an assistant with "openai" as a vendor. See OpenAI Speech below.
OpenAI functions
We provide a comprehensive set of OpenAI functions. These functions power the AI blocks in the Journey Canvas but they can be used directly from code blocks as well.
OpenAI: Connecting
You can either use the built-in AI Assistant to connect to OpenAI as an Assistant or you can connect directly with a token. The connection details are stored in the variable returned and should be passed as an argument to any of the other OpenAI related functions.
card Start do
  # connect using an assistant configured in your account
  ai = openai_assistant()
  # or connect directly with a token and model identifier
  ai = openai_connect("the-token", "gpt-4o")
end
OpenAI: Adding Context
Add a single message, with an accompanying role to the context with openai_add_message(). This context will be included in chat completions.
ai = openai_add_message(ai, "user", "the message")
OpenAI: Adding images
Add an image for when you want to ask a question about a user submitted image and limit the response size of the answer to 150 characters.
image_url = attachment_url(event.message.image.id)
ai = openai_add_image(ai, "user", "the message", image_url, 150)
OpenAI: Chat Completion
Chat Completion is the function for using OpenAI to generate text based on the context supplied
completion = openai_chat_completion(ai)
This returns a complex object with a default value:
%{
  "error" => false,
  "status" => 200,
  "response" => %{
    "sentences" => ["the generated.", "response."],
    "__value__" => "the generated. response.",
    "combined" => "the generated. response."
  }
OpenAI: Transcribing Speech
transcription = openai_transcribe(ai, "https://example.org/file.mp3", "context", "en")
This returns the transcribed text of the supplied audio file. To transcribe
received voice notes use the attachment_url() function to create a temporary
URL and supply that value to this function's URL parameter.
OpenAI: Creating Speech
Convert text to audio speech in the given voice and using the given model. Refer to OpenAI's documentation on valid values for these parameters.
attachment = openai_create_speech(ai, "text to speak", "voice", "model")
This returns an attachment which can be used with audio("@attachment.external_id") to send over WhatsApp to an end user.
Lelapa.ai functions
We provide a comprehensive set of Lelapa.ai functions. These functions can be used directly from code blocks.
To use these functions you need to have an account at https://lelapa.ai/ and generate a token there.
Connecting
You can connect directly with a token from the Lelapa API. The connection details are stored in the variable returned and should be passed as an argument to any of the other OpenAI related functions.
card Start do
  conn = lelapa_connect("the-token")
end
Intent Classification
This connects to Lelapa's Intent Classification API.
Allows users to classify inputs into specified intents with minimal training data across multiple languages.
result =
  lelapa_intent_classification(
    conn,
    "Hey, how are you?",
    [
      ["greeting", "Hello!"],
      ["greeting", "Hi there!"],
      # how are you?
      ["greeting", "Habari yako?"],
      ["goodbye", "Goodbye!"],
      ["goodbye", "See you later!"],
      # bye
      ["goodbye", "Kwaheri"],
      # see you later              ]
      ["goodbye", "Tutaonana baadaye"]
    ]
  )
This returns the highest matched intent and the score:
%{
  "__value__" => "greeting",
  "score" => 0.74386334,
  "intent" => "greeting"
}
Entity Recognition
This exposes the Entity Recognition API.
result =
  lelapa_entity_recognition(
    conn,
    "President Ramaphosa gaan loop by Emfuleni Municipality."
  )
and it returns the list of entities extracted:
[
  %{
    "entity" => "person",
    "word" => "Ramaphosa",
    "start" => 10,
    "end" => 19
  },
  %{
    "entity" => "location",
    "word" => "Emfuleni Municipality",
    "start" => 33,
    "end" => 54
  }
  ]
Sentiment Analysis
This exposes Sentiment Analysis API.
result =
  lelapa_sentiment_analysis(
    conn,
    "am happy. i am sad. hello!"
  )
And returns the following value:
%{
  "__value__" => "positive",
  "score" => 0.9991829991340637,
  "text" => "am happy",
  "label" => "positive",
  "sentiments" => [
    %{
      "sentiment" => [%{"label" => "positive", "score" => 0.9991829991340637}],
      "text" => "am happy"
    },
    %{
      "sentiment" => [%{"label" => "negative", "score" => 0.960746169090271}],
      "text" => " i am sad"
    },
    %{
      "sentiment" => [%{"label" => "neutral", "score" => 0.8527688384056091}],
      "text" => " hello"
    }
  ]
}
The highgest scoring sentiment is the default value.
Translate
Exposes the Translation API.
result =
  lelapa_translate(
    conn,
    "Lo musho ubhalwe ngesiZulu.",
    "zul_Latn",
    "eng_Latn"
  )
Which returns the translation of the supplied text:
%{
  "__value__" => "This sentence is written in Zulu.",
  "translation" => [%{"translation_text" => "This sentence is written in Zulu."}]
}
Integrating with ML models hosted on Huggingface.co
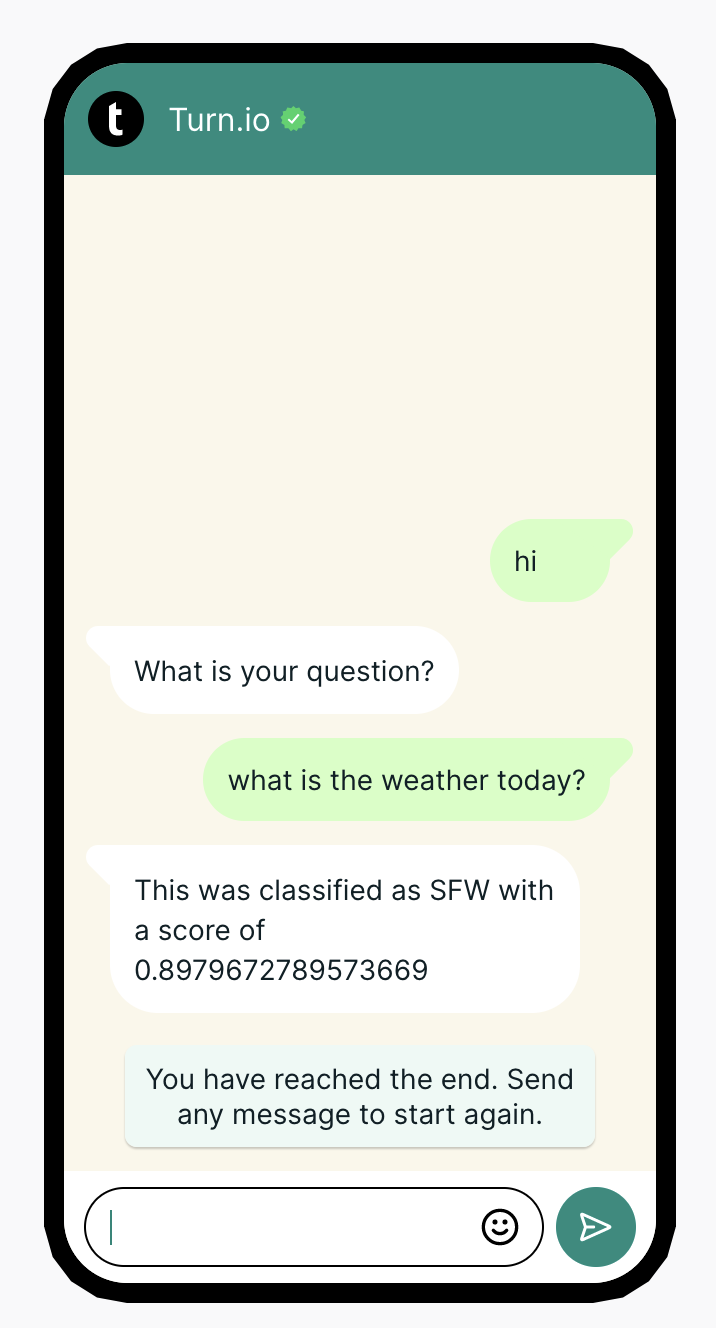
Often a user experience can be improved by using a machine learning model to infer the meaning of the submitted request. A convenient way to do this is to use models hosted on Huggingface.co.
Here is an example using the hf_connect and the hf_infer functions to interact with Huggingface APIs.
Setting up a connection to a model
In the following card we setup a connection to a model hosted on Huggingface and store the reference to it in a variable called connection.
card Start, then: HFCard do
  connection =
    hf_connect(
      "michellejieli/NSFW_text_classifier",
      "<- insert your Hugggingface API token here ->"
    )

  query = ask("What is your question?")
end
In the example above we are using an freely available NSFW classification model called michellejieli/NSFW_text_classifier. This can be replaced with a model of your liking. If you have a model running on a custom Huggingface domain you can refer to it by URL:
hf_connect(
  "https://my-custom.endpoints.huggingface.cloud/the-model",
  "<- insert your Hugggingface API token here ->"
)
Calling the Inference API with the model
In the following card we use the hf_infer() function to submit the query to the model being referred to in the connection variable.
As per the model's documentation at Huggingface the response from the model has the following shape:
[
  [
    {
      "label": "SFW",
      "score": 0.9408659934997559
    },
    {
      "label": "NSFW",
      "score": 0.05913396179676056
    }
  ]
]
Processing the model's results
The model in this example returns a list of results and we need to pick the result with the higest score. The model may already always return the highest scoring label as the first value in the list but given we're not sure about that we apply sorting in the journey anyway.
card HFCard, then: HFResult do
  # This model returns a list with lists, we're wanting to read the first list item
  # as that has the list of scorings for the given query
  all_responses = hf_infer(connection, query)[0]
  # Sort with descending score
  sorted_responses = sort_by(all_responses, &(&1.score * -1))
  # Get the first item from the sorted responses, this is the one with the highest score
  top_response = sorted_responses[0]
end
Turn calls the Huggingface API with the wait_for_model parameter set to true. If the model in question takes some time to startup then the first interactions may hit a timeout. Note that the default timeout for Huggingface models is 5 seconds. This is currently not configurable.
Using the results to make an informed decision
Next we use the result stored in the top_response variable to determine what
to do with the original query. In this case, because this is a demo, we're just
returning the label and the score. In your applications you'll likely want to modify this to do something that suits your usecase and requirements.
card HFResult when top_response.label == "NSFW" do
  text("This was classified as NSFW with a score of @top_response.score")
end

card HFResult when top_response.label == "SFW" do
  text("This was classified as SFW with a score of @top_response.score")
end

card HFResult do
  text("Huggingface returned something unexpected: @all_responses ")
end
Assigning labels to messages
When handling a pivotal moment in a journey, say a question received a specific response, it can be useful to add a label to a message. This allows it to be included in collections set up specifically to track messages with one or more labels applied.
Adding a label can be achieved with the add_label() function.
card AddLabel do
    add_label("a plain label")
    add_label("a label with metadata", extra: "label assigned at @now()")
end
If the label doesn't exist yet, it will be created. In some use cases it can useful to allocate extra metadata about the label. These can be added as key-value pairs as the second argument to the add_label() function. This metadata is stored on the assignment between the message and the label. If one retrieves the labels assigned to a message via the API, the metadata will be available there.
The label is always applied to the last message received from the user.
Assigning chats to an operator
Even in the most automated services, some questions simply need the attention of a human being. Journeys allow a chat to be assigned to an account within the Turn organisation the number is part of. Like labels, this assignment can be used to create collections that require the attention of a specific operator.
Assigning a chat to an operator can be achieved with the assign_chat_to() function.
card AssignChat do
    assign_chat_to("user@example.org")
end
This will only work if the email address is of a known account within the number's organisation. If the email address is not recognised, it will clear any chat assignment.
To explicitly remove an operator assignment from a chat use the unassign_chat() function:
unassign_chat()
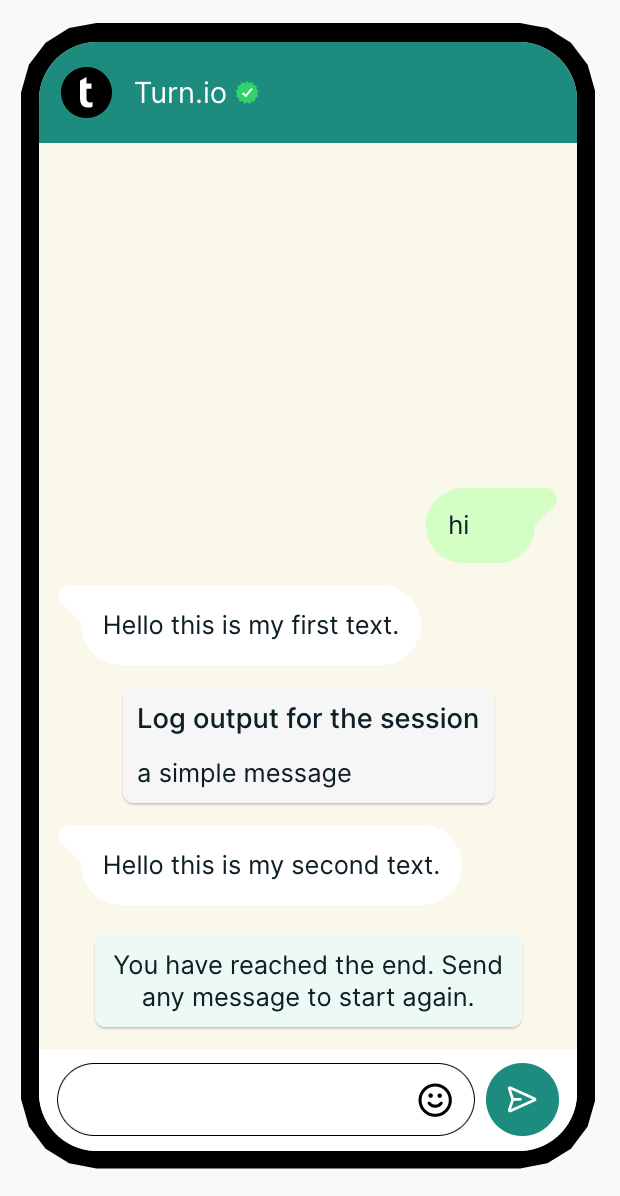
Logging in the Journeys Simulator
Sometimes we want to be able to understand and debug the behavior of our journeys without adding messages to the chat. The Journeys Simulator allows us to do this by logging messages to the simulator with the log function.
A simple example where we just want to add text.
card TextAndLogMessage do
  text("Hello this is my first text.")
  log("a simple message")
  text("Hello this is my second text.")
end
However, you can also use it to log more complicated data structures, such as the dictionary below.
You could also log structures such as @contact, made available within the chat.
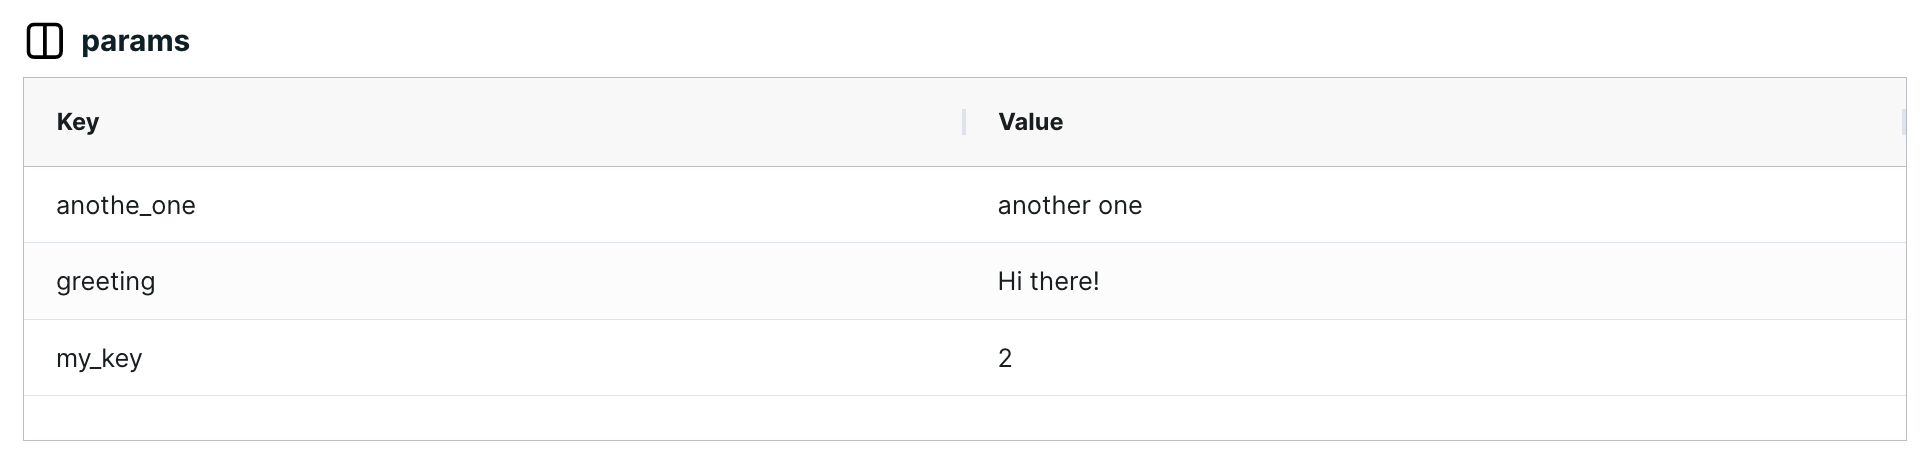
card LogData do
  text("@params.items.greeting!")
  log("@params")
  log("@contact")
end
Will result in the following:
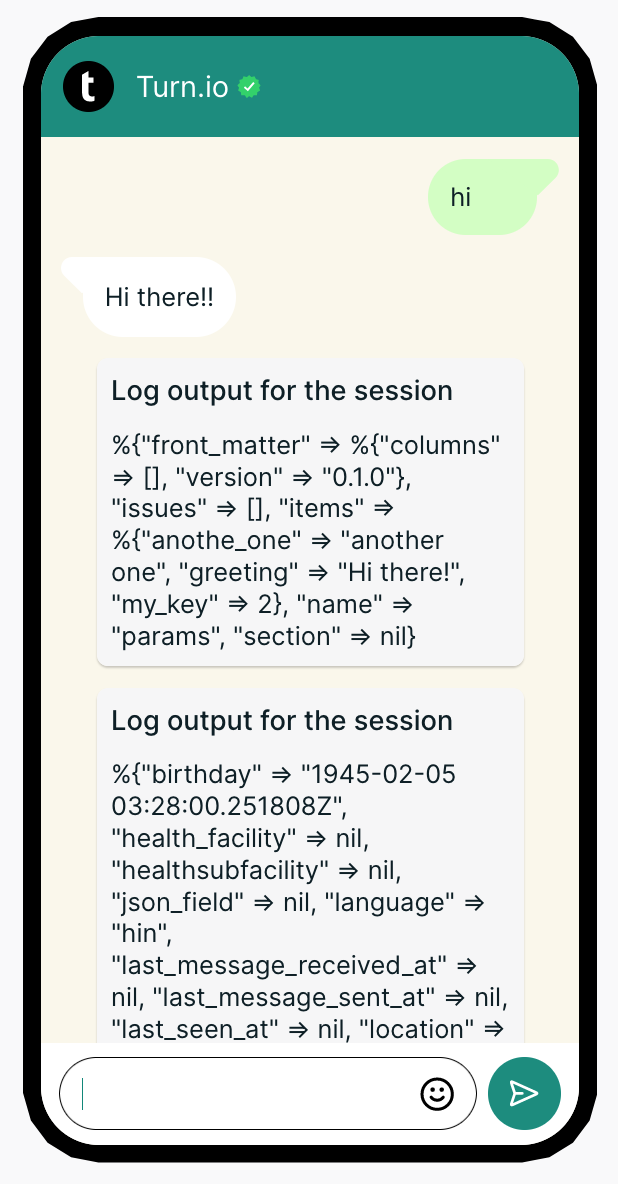
-
You need to pass in a string. If you want to evaluate a more complicated structure like
contacts, you need to use an expression - so uselog("@contact"), notlog(contact). The Journey will highlight this issue as an error if you attempt to do this. -
logcurrently only works within the Journeys simulator. They will not affect interactions when using a Stack directly via WhatsApp. -
Logs are temporary. They will disappear each time you start a new session with the Journeys simulator
Timing and flow control
Add a delay
This function introduces a delay in the Journey flow before continuing to the next action.
Example
The following example creates a journey that sends a greeting, waits for 3 seconds, then sends a follow-up message.
card DelayedMessage do
    text("Hello! I'm processing your request...")
    wait(3)
    text("Thanks for waiting! Here's your response.")
end
You can also use variables and expressions for the wait time:
card VariableDelay do
    delay_time = 5
    text("Starting process...")
    wait(delay_time)
    text("Process complete!")
end
Key things to note
- The
wait()function accepts the number of seconds to delay as an integer, with a maximum of10 - The delay happens server-side - users won't see any indication that the journey is waiting
- Wait times can be specified using variables or expressions
- Use delays strategically to create natural conversation flows or avoid rate limit situations
Advanced functions
Interaction timeout
Journeys have a timeout value. The default is 300 seconds (equating to 5 minutes). If a user takes longer that 5 minutes to respond to a request for input (for example a question from ask()) the journey will expire. This means that it won't respond as expected if the user comes back after more than 5 minutes.
You can change the timeout to any value that makes sense to you. Timeout values need to be specified in seconds.
Syntax
The timeout is defined with the interaction_timeout optional journey parameter.
stack MyJourney, interaction_timeout: 20 do
    ...
end
Example
The following example gives a user 10 seconds to reply in order to win. If the user takes longer than 10 seconds the journey has expired and the user did not win.
The user replied within 10 seconds.

The user took longer than 10 seconds to reply and journey expired.

interaction_timeout(10)

card Card, then: Win do
  ask("You have 10 seconds to reply to win!")
end

card Win do
  text("congrats! you replied on time")
end
Key things to note
- Timeout values need to be specified in seconds.
- The default timeout is 300 seconds (equating to 5 minutes).